
Introduction#
In a previous article I explained the Linux boot process. The last step of the Linux boot process is the execution of init system’s binary. But what if we don’t want to have a conventional init system? In this article, we are going to write our own /init script.
Compiling the Linux kernel#
First, we need to compile the Linux kernel. To do this, we need to obtain the Linux source code. Let’s clone the git repository.
git clone git://git.kernel.org/pub/scm/linux/kernel/git/torvalds/linux.git # clone the git repository
cd linux/
Next, let’s choose a specific Linux version. You can see a list of versions using git tag command. I chose v6.1.
git checkout v6.1Next, let’s start the build process.
make mrproper
make defconfig # use the default config
make -j"$(nproc)" # compile with multiple jobs
nproc command returns the number of your CPU threads. To make the compilation faster, we use all the threads.
On my machine it took almost 5 minutes to finish.
It finished with a following message:
Kernel: arch/x86/boot/bzImage is readyAt this point we are pretty much ready to boot our kernel using QEMU, but the kernel is going to panic, because it can’t find the /init executable in the initramfs. Let’s create it!
Creating the /init executable#
All we need is a single statically linked ELF file. Here is an example C program:
// init.c

#include <stdio.h>

int main()
{
    printf("\n\n\nHello, world!\n\n\n\n");

    while (1);
}
Notice the infinite while loop at the end of the main function. We can’t exit the program, because the kernel will also panic as it does not expect the init process to quit.
We compile it using the following command:
gcc -static init.c -o initThe executable is ready to be put into the initramfs and executed by the kernel.
Creating the initramfs#
To create the initramfs, use the following commands:
mkdir initramfs/
cp init initramfs/
cd initramfs/
find . | cpio -oH newc | gzip > ../root.cpio.gz
ROOTFS_PATH="$(pwd)/../root.cpio.gz"
We define a ROOTFS_PATH variable, because we will use the path to the archive later.
Our initramfs is ready.
Booting the system using QEMU#
Now, we can boot our “system” using QEMU. Go back to the Linux kernel repository.
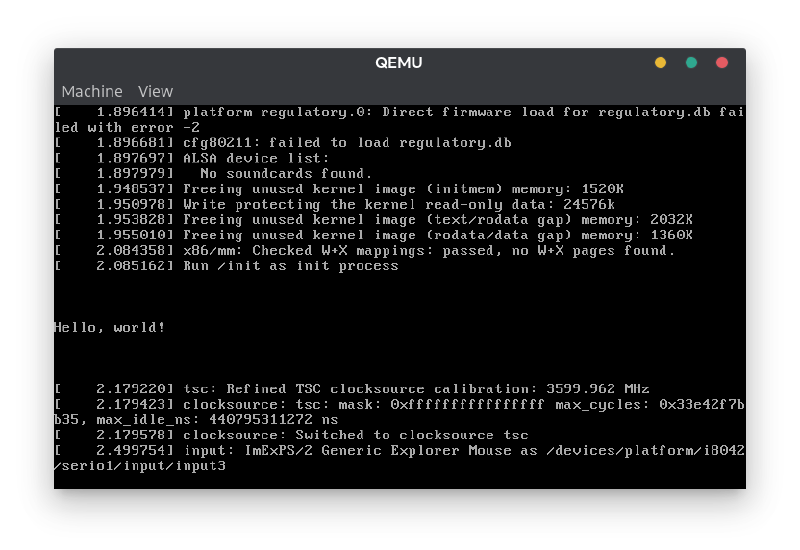
qemu-system-x86_64 -kernel arch/x86/boot/bzImage -initrd "$ROOTFS_PATH"After running the command, we can see that /init has been executed successfully.
Creating an ISO image#
To create an ISO image that you can run in any other virtualization software or even a real hardware, run the following command:
make isoimage FDINITRD="$ROOTFS_PATH" FDARGS="initrd=root.cpio.gz"After finishing, the generated ISO image is located in arch/x86/boot/image.iso.
Installing BusyBox#
We successfully booted a minimal Linux system with just a kernel and /init executable. It is not very useful though. Let’s make it more interesting by installing BusyBox.
BusyBox is a software suite that provides several Unix utilities in a single executable file. It provides the utilities we commonly know and use, like: ls, find, tree, touch, rm and many more. BusyBox offers more than 480 commands.
First, we need to clone, configure and compile BusyBox.
git clone https://github.com/mirror/busybox.git
cd busybox/
make defconfig
echo CONFIG_STATIC=y >> .config
make -j"$(nproc)"
make CONFIG_PREFIX="$PWD/initramfs" install
This will generate many files inside initramfs/ directory.
Next, we add the /init script inside the initramfs.
cd initramfs/
touch init
chmod +x init
Paste the following contents into the /init script.
#!/bin/sh

# mount required directories
mount -t proc proc /proc
mount -t sysfs none /sys
mount -t devtmpfs udev /dev

# launch interactive shell
/bin/sh

# if shell exits, poweroff to prevent kernel panic
poweroff -f
Finally, let’s pack the initramfs.
find . | cpio -oH newc | gzip > ../root.cpio.gz
ROOTFS_PATH="$(pwd)/../root.cpio.gz"
Go back to the Linux kernel repository and again, create the ISO using the following command:
make isoimage FDINITRD="$ROOTFS_PATH" FDARGS="initrd=root.cpio.gz"Now, the ISO image that was generated in arch/x86/boot/image.iso is basically the most minimal Linux distro. It contains only a Linux kernel and some basic utilities.
Make a bootable USB#
To run it on a real hardware, you need to make a bootable USB. Insert your empty USB drive and make sure to check its device path using something like fdisk -l or lsblk. My USB drive is /dev/sdc. To flash the USB drive with the ISO image, run the following command.
sudo dd if=arch/x86/boot/image.iso of=/dev/sdcNow you can reboot your computer, go into your motherboard’s boot menu and boot the system from the USB drive.